WordPress is a popular tool for building websites, and it has many helpful features. One of these features is called “post revisions.” This feature automatically saves different versions of your posts and pages as you work on them. If you make a mistake or want to see how your content looked before, you can easily go back to an earlier version. In this blog post, we will explain what post revisions are, how they work, why they are useful, and how you can manage them to keep your website running well.
What is Post Revisions?
Post revisions is a feature of WordPress that allows you to undo your changes and go back to a previous copy of your posts or pages.
WordPress creates post revisions each time a user clicks on the save, update, or publish button. these revisions are permanently stored in the WordPress database like a post.

WordPress also has an autosave feature. In which WordPress automatically creates an auto-save revision every 60 seconds. auto-save are temporary revision and automatically replaces the older version with the new auto-save on creation. It saves your post content when the unlikely happens, such as power outages or browser crashes.
if your browser crashed or your computer hanged while writing, then you can restore your latest draft from the autosave or your post from the revisions list.
Importance of WordPress post revision
WordPress revision is a great feature added by WordPress. It helps the blogger or writer to write a perfect blog without being worry about data loss.
Revision keeps track of each line and changes done in it over a period of time. For multisite this feature helps site users with Editor role to review changes done by different authors.
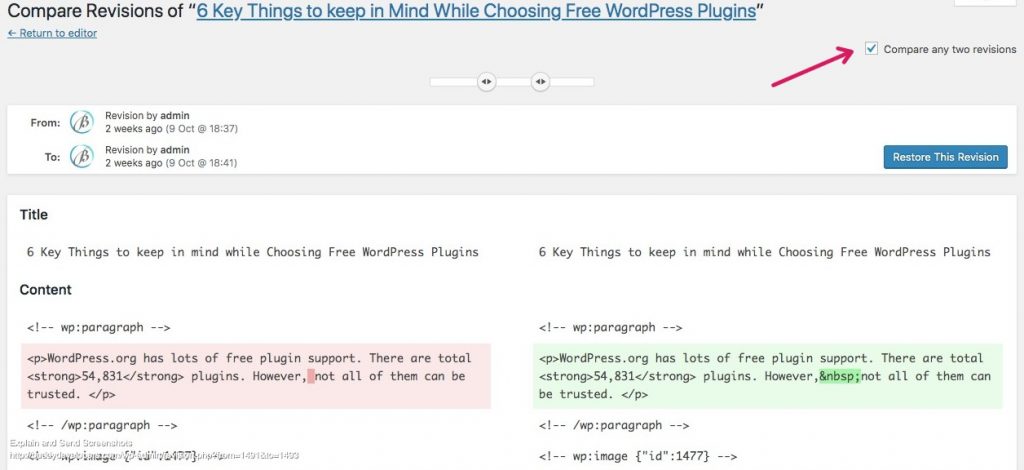
It allows you to see what changes were made in each revision. The display indicates what has changed in each revision – what was added/removed, remained unchanged. Lines added or removed are highlighted, and individual character changes get additional highlighting.

How to use WordPress revision
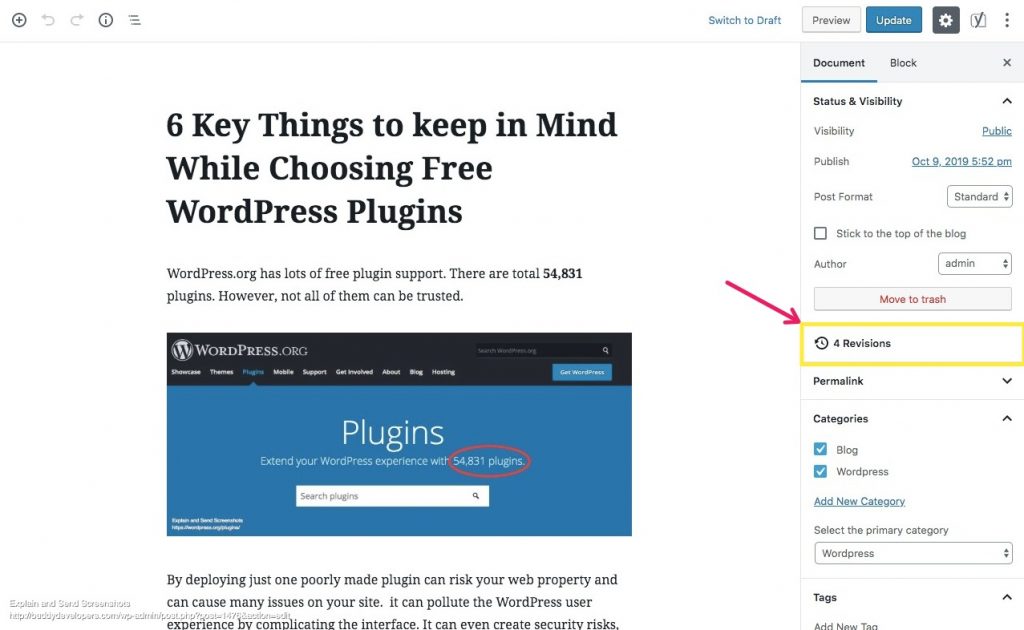
WordPress displays the number of revisions on the right-hand side of your post editor screen, under the ‘Document’ panel. Clicking on the ‘Revisions’ will take you to post revisions screen.

The Screen will show you the latest revisions of the post with pagination and scroller on top. this pagination and scroller will move you to earlier revisions of the post.
On the top, you will see a button “Restore This Revision”. clicking on it will make the current state of revision as your post content.
Keep in mind that restoring to an earlier revision will not delete the latest version of your post. Instead, WordPress will store it as another revision in the database.
You can also compare two revisions with the help of a checkbox ‘Compare any two revisions’ on top.

Making it checked will split the scrollbar button into two, and you can take each button to a different revision and compare the content of both revisions.
How it affects Site performance
When you run a WordPress site, it’s important to know how post revisions impact performance. Post revisions save different versions of your posts, which is great for managing content and going back to previous versions. However, too many revisions can slow down your site.
Revisions take up space in your WordPress database. For each revision one post entry get created in database with post type revision. If you publish a lot of content, you can end up with hundreds of post revisions. For example, a site that publishes five posts a week for a year can have over 1,000 revisions. This makes the database much larger and can slow down your site, making it less user-friendly.

Sometime If a plugin or theme doesn’t specifically exclude post revisions, it might slow down your site by searching through them unnecessarily.
Example:
/**
 * Wrong Query.
 */
$args = array(
    'post_type' => array( 'any')
);
$query = new WP_Query( $args );
Research shows that reducing the number of post revisions can greatly improve performance. WPBeginner found that limiting post revisions to five per post reduced the size of the revisions data by 95%, which made the site much faster.
Real-world examples also show that sites perform better after setting a limit on revisions or using plugins to delete old revisions.
By managing post revisions well, you can keep the benefits of version control without slowing down your site.
How to Optimize WordPress Revision for Faster Performance
WordPress revisions can contribute to increased database size and potentially impact the performance of your website over time. Optimizing WordPress revisions can help improve the overall performance of your site. Here are some steps you can take:
- Limit the Number of Revisions: In your
wp-config.phpfile, you can define the maximum number of revisions to keep for each post. Add the following line to limit revisions, whereXis the desired number of revisions to keep:
define('WP_POST_REVISIONS', X);- Use a Plugin: There are several plugins available that can help you manage and optimize revisions. One popular option is the “WP Revisions Control” plugin, which allows you to control the number of revisions and also delete existing revisions.
- Disable Revisions for Specific Posts: For posts where revisions are not essential, you can disable revisions altogether. You can do this by adding the following code to your theme’s
functions.phpfile for individual posts
function disable_post_revisions($return, $post_id) {
    return false;
}
add_filter('wp_save_post_revision_check_for_changes', 'disable_post_revisions', 10, 2);- Clean Up Existing Revisions: You can use plugins like “WP-Optimize” or “WP-Sweep” to clean up existing revisions. These plugins can also help you optimize your database by removing unnecessary data.
- Manual Database Cleanup: If you’re comfortable working with databases, you can manually remove revisions from the
wp_poststable using SQL commands. However, make sure to back up your database before making any changes. - Regularly Backup Your Site: Before making any significant changes, including optimizing revisions, it’s crucial to have a complete backup of your WordPress site. This ensures that you can restore your site in case something goes wrong.
How to limit WordPress revision
Where X is the number of limits. X = 2 will only be 2 revisions for a post.
define('WP_POST_REVISIONS', X);How to Delete Old Post Revisions in WordPress
To delete old post revisions in WordPress, you have a few options. You can use a plugin or execute SQL queries manually. Here’s how to do it using both methods:
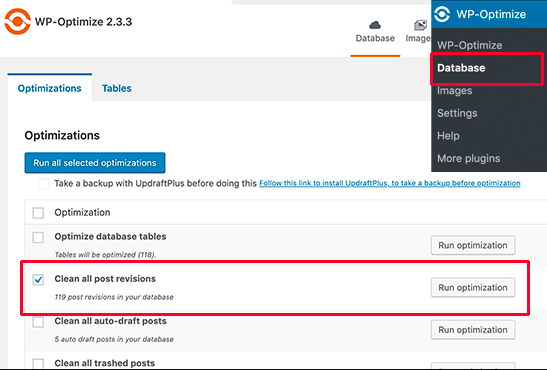
Deleting WordPress post revisions Using a Plugin (WP-Optimize)
- Install and activate the WP-Optimize plugin from the WordPress Plugin Directory.
- Once activated, go to WP-Optimize tab in your WordPress dashboard.
- Under the Database Tables section, you’ll find a list of tables that can be optimized. Look for the post revisions option.
- Check the box next to post revisions and any other database entries you want to clean up.
- Scroll down and click the Run Optimization button to clean up your database, including deleting old post revisions.

Deleting WordPress post revisions via phpMyAdmin
If you’re comfortable working with databases, you can manually delete old post revisions using SQL queries. However, proceed with caution and make sure to back up your database before making any changes.
- Log in to your website’s hosting control panel or use a tool like phpMyAdmin to access your site’s database.
- Locate your WordPress database in the list of databases (if you have multiple databases).
- Click on the SQL tab to execute SQL queries.
Here are the SQL queries you can use:
-- To see how many revisions each post has
SELECT COUNT(*) FROM wp_posts WHERE post_type = 'revision';

-- To delete all revisions
DELETE FROM wp_posts WHERE post_type = 'revision';

-- To delete revisions except for the most recent one for each post
DELETE p FROM wp_posts p
LEFT JOIN (
    SELECT ID, post_parent, post_type, MAX(post_date) AS max_post_date
    FROM wp_posts
    WHERE post_type = 'revision'
    GROUP BY post_parent
) AS r ON p.post_parent = r.post_parent
AND p.post_type = r.post_type
AND p.post_date = r.max_post_date
WHERE r.post_parent IS NULL;
Replace wp_ with your actual WordPress database table prefix if it’s different.
How to delete WordPress revisions With WP-CLI
You can use the WP-CLI tool to delete WordPress revisions using the command line. Here’s how you can do it:
- Access Command Line: Open your terminal or command prompt on your computer.
- Navigate to Your WordPress Installation: Use the
cdcommand to navigate to the root directory of your WordPress installation. - Run the WP-CLI Command: Use the following WP-CLI command to delete revisions:
wp post delete $(wp post list --post_type='revision' --format=ids)
This command first retrieves a list of all post revisions usingwp post listand then passes the list of IDs to thewp post deletecommand to delete them. - Confirm Deletion: After running the command, you might be asked to confirm the deletion. Type
yto confirm and proceed.
Please note:
- Ensure you have the WP-CLI tool installed on your server.
- Running this command will permanently delete all post revisions. Make sure you have a backup of your database before proceeding.
- Be careful when using command-line tools, especially when dealing with database-related actions.
If you want to delete only specific revisions or want more control over the process, you might need to modify the WP-CLI command accordingly. Always be cautious and consider testing the command in a development environment before applying it to your live site.
How to Completely Disable WordPress Post Revisions
To completely disable WordPress post revisions, you can use the wp-config.php file or a plugin. Here’s how you can do it using both methods:
Method 1: Using wp-config.php:
- Connect to your website’s server using FTP or a file manager.
- Locate the
wp-config.phpfile in your WordPress root directory. - Open the
wp-config.phpfile in a text editor. - Add the following line of code just above the line that says
/* That's all, stop editing! Happy blogging. define('WP_POST_REVISIONS', false);
This will completely disable post-revisions. - Save the
wp-config.phpfile and upload it back to your server.
Method 2: Using a Plugin (Disable Post Revision):
- Log in to your WordPress admin dashboard.
- Go to “Plugins” and click “Add New.”
- Search for “Disable Post Revision” in the plugin search bar.
- Install and activate the “Disable Post Revision” plugin.
- Once activated, the plugin will automatically disable post revisions on your site.
No matter which method you choose, keep in mind:
- Disabling post revisions will prevent WordPress from saving multiple revisions of your posts, which can help keep your database cleaner.
- While this action can reduce database size, it also means you won’t have the ability to revert to earlier versions of your posts.
- If you choose to disable post revisions, it’s a good practice to make sure you have regular backups of your site’s content and database, so you can restore the content if needed.
After making any changes to your WordPress site’s configuration or using plugins, it’s a good idea to check the site’s functionality and appearance to ensure everything is working as expected.
Important:
- Always back up your database before making any changes.
- If you’re not comfortable with SQL queries, consider using a plugin or seeking professional help to avoid accidentally damaging your site.
Whichever method you choose, make sure to regularly perform such maintenance tasks to keep your WordPress database optimized and your site’s performance in top shape.
If you liked this guide, then please consider subscribing to our YouTube Channel for WordPress video tutorials. You can also find us on Twitter and Facebook.


